Showing posts with label tutorial. Show all posts
February 1, 2014
Free Pattern - Boucle Headband and Cowl Set
To get myself through the last few months of winter (so sad!), I felt like I needed something new and pretty. My scarf, even though I really love it, can be burdensome because of the length. About a year ago, I bought some yarn I just loved from which to make a slouch hat. Unfortunately, the pattern I was using didn't make a whole lot of sense and I never got it done. I was in headband making mode, so I thought I would whip this little set up.
Enjoy!
Boucle Headband and Cowl Set (adult size)
Materials:
Lion Brand Silky Twist in Linen (2 5oz. balls)
Size N crochet hook
Yarn Needle
Large Buttons (optional)
Stiches:
ch = chain
dc = double crochet
dc2tog = double crochet two together
Headband:
Ch7
Row1: In second ch from hook, dc in each ch across. Ch 3. Turn. (5)
R2: Dc in first two stitches, 2dc in third stitch, dc in last two stitches. Ch 3. Turn. (6)
R3: Dc in each stitch across. (6)
R4: Dc in first three stitches, 2dc in fourth stitch, dc in last two stitches. Ch 3. Turn. (7)
R5: Repeat R3 (7)
R6: Dc in first three stitches, 2dc in fourth stitch, dc in last three stiches. Ch 3. Turn. (8)
R7: Repeat R3 (8)
R8: Dc in first three stitches, 2dc in fourth stitch, dc in last four stiches. Ch 3. Turn. (9)
R9: Repeat R3 (9)
R10: Dc in first four stitches, 2dc in fifth, dc in last four stiches. Ch 3. Turn. (10)
R11: Repeat R3 (10)
R12: Dc in first four stitches, dc2tog, dc in last four stiches. Ch 3. Turn. (9)
R13: Repeat R3 (9)
R14: Dc in first three stitches, dc2tog, dc in last four stitches. Ch 3. Turn. (8)
R15: Repeat R3 (8)
R16: Dc in first three stitches, dc2tog, dc in last three stitches. Ch 3. Turn. (7)
R17: Repeat R3 (7)
R18: Dc in first two stitches, dc2tog, dc in last three stitches. Ch 3. Turn. (6)
R17: Repeat R3 (6)
R16: Dc in first two stitches, dc2tog, dc in last two stitches. Ch 3. Turn. (5)
R17: Dc in each stitch across. (5) Do not fasten off. First, test the headband around your head to make sure it would fit. If you need to add more length, repeat row 3 until long enough.
Once headband is long enough, fasten off, leaving a long thread for sewing.
To sew the ends together, use a mattress stitch. (It can be tough with this yarn, but if you do your best, it should be fine). Weave in ends.
Alternatively, you can fasten off and weave in as usual and then add a large button to one end. To fasten just slip the opposite end over the button.
Cowl:
Ch22
Row 1: Dc in second chain from hook and each chain across. Ch 3. Turn. (20)
R2-36. Dc in each st across. Ch 3. Turn. (20)
R37: Dc in each st across. (20) Do no fasten off. Test the cowl around your neck to make sure it drapes down as far from or as close to your neck as you would like it. If you need to add more length, repeat row 2 until it's until long enough.
Once the cowl is the size you want, fasten off, leaving a long thread for sewing.
Sew the ends together using a mattress stitch. Weave in ends.
Alternatively, you can fasten off and weave in as usual after the last row and then add two or three large buttons to one end of the cowl. To fasten just slip the opposite end over the buttons.
Show me yours!
Questions, comments, or see a mistake? Leave a comment for me.
July 5, 2013
Rhubarb Leaf Stepping Stone Turorial
Well, hello! I'm glad you tuned in! I have a super-fun, super-easy garden project for you this week!
We're going to build a concrete stepping stone.
I ran across this project when one of the guys at work mentioned rhubarb leaf bird baths. He said you could use the leaves to "mold" the leaf into the concrete. Since I have a number of rhubarb mounds that spawn gigantic leaves (some are 18" wide and 24" long), I wanted to try this out. What a great way to have a unique yard or garden decoration. I guarantee any guest that sees it will be asking where you found one!
What you'll need:
First, pick out a nice healthy leaf. A really veiny one that will really leave some good imprints in the concrete. Mine is really big, but you could make small ones, round ones, square ones, etc. (but you'd have to build or buy a mold for that). Cut (or fold) your chicken wire to fit inside your leaf. Folding seemed like the easy route, but I wish I'd cut it instead.
Next, you'll want to find an area that's relatively flat and probably in the grass so that you don't get any concrete on your driveway or sidewalk. Lay out your plastic. I used a garbage bag.
Mix your concrete or cement until its a nice, thick, pliable, consistency. I've heard that it should be like brownie batter. That's probably a pretty good comparison. I mixed my concrete a half bag at a time inside an old cat litter bucket. It's hard work so plan on sweating a little. Make sure to use your little shovel to get down to the bottom of the container and get all the crumbles and mix.
****I want to stress here that concrete dust can be dangerous. If you don't have previous experience mixing concrete and have never handled it before, wear a dust mask and gloves. It also dries your skin out badly so gloves are recommended anyway. When you pour the mix into the bucket, try to minimize dust production in the first place.****
Once your concrete is ready, lay your leaf upside down (so the veins are sticking up) on the plastic and arrange how you'd like it to be. Using your gloved hands or your spade, glob your concrete onto the leaf making a layer about 1" to 1.5" thick. Depending on how you want your stepping stone, you may or may not want to extend your concrete past your leaf. Pat down smooth to make sure any air bubbles are released. Some of the water will rise to the surface.
Place your chicken wire on top and gently press down. Be careful not to poke or cut yourself with any cut wires.
Glob more concrete on top of the chicken wire to make another layer 1" to 1.5" thick. Pat smooth again so any more bubbles will be released.
Use the plastic to "round" the edges of your soon-to-be garden decoration. Do this by lifting the edges of the plastic and using your hands to pack and pat the concrete. This will help give it a nice smooth edge instead of a crumbly, jagged one.
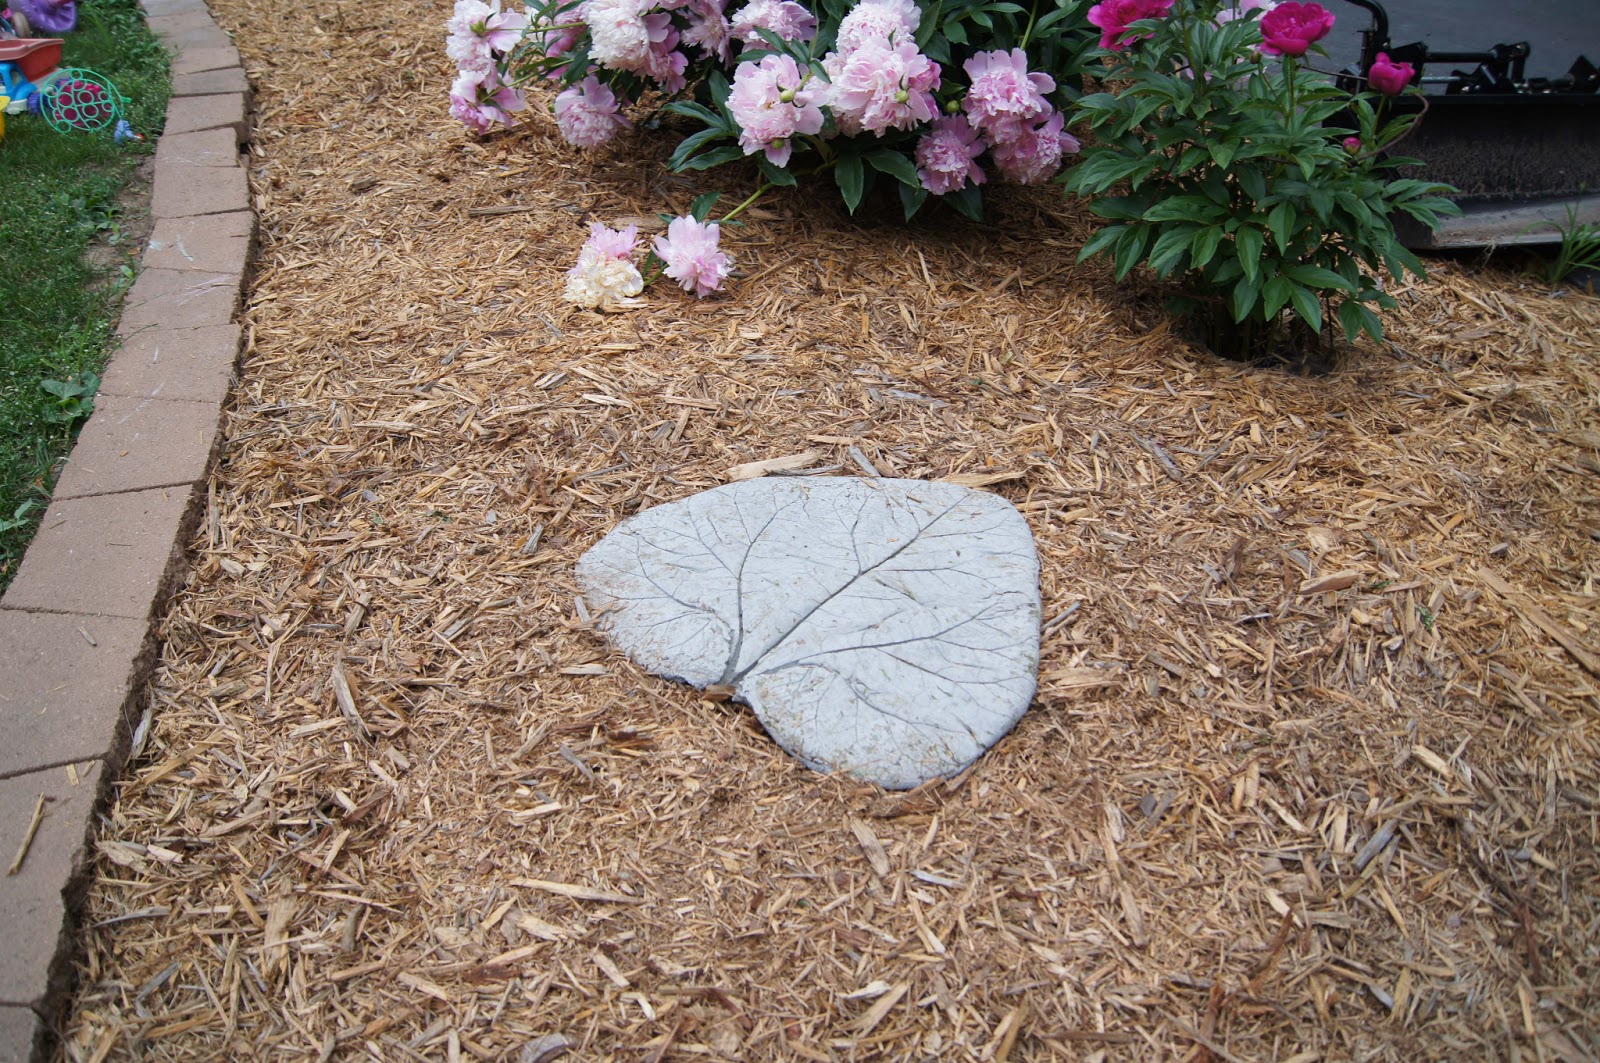
Now. The hard part. You have to wait for the concrete to do it's thing. Let it harden, or cure, depending on what kind of concrete or cement mix you're working with. The bag will give you the details. After about 24 hours, I was able to flip mine over and move it into the sun where it can cure and where the leaf will dry out faster. (more pix to come once it's in the garden!)
Once it's dry and you can't leave marks in it, remove the leaf. If you have a hard time getting the bits out, try a stiff bristled scrub brush, or just leave it - the weather will eventually take care of it for you.
Want to check out some other resources before you commit yourself to my process? I don't blame you! Check out Suzie Homefaker's blog for more info on how to color your concrete or the Gardens West website. You can also just do a google image or google web search, but make sure you have your antivirus program running in case you run into some malware along the way (I did). Avast Antivirus is free and is a great antivirus program. I've been using it for years.
So head outside when the weather's nice and make yourself some stepping stones! If you have a question, please feel free to comment! I love to get comments and interact with you!
We're going to build a concrete stepping stone.
I ran across this project when one of the guys at work mentioned rhubarb leaf bird baths. He said you could use the leaves to "mold" the leaf into the concrete. Since I have a number of rhubarb mounds that spawn gigantic leaves (some are 18" wide and 24" long), I wanted to try this out. What a great way to have a unique yard or garden decoration. I guarantee any guest that sees it will be asking where you found one!
What you'll need:
- A rhubarb leaf or a leaf of any kind that has good veins. I've heard of people using elephant ears, canna lily leaves, large maple leaves, and more. Use your imagination!
- Chicken wire or hardware cloth (for stability and structure)
- Wire cutters
- Concrete or Masonry Cement - You could probably also use the vinyl concrete repair cement
- Plastic bag
- Bucket, wheel barrow, or other container in which to mix
- Water
- Trowel or garden spade, to aid in mixing
First, pick out a nice healthy leaf. A really veiny one that will really leave some good imprints in the concrete. Mine is really big, but you could make small ones, round ones, square ones, etc. (but you'd have to build or buy a mold for that). Cut (or fold) your chicken wire to fit inside your leaf. Folding seemed like the easy route, but I wish I'd cut it instead.
| This is what I used for concrete. The options are literally overwhelming. |
Next, you'll want to find an area that's relatively flat and probably in the grass so that you don't get any concrete on your driveway or sidewalk. Lay out your plastic. I used a garbage bag.
Mix your concrete or cement until its a nice, thick, pliable, consistency. I've heard that it should be like brownie batter. That's probably a pretty good comparison. I mixed my concrete a half bag at a time inside an old cat litter bucket. It's hard work so plan on sweating a little. Make sure to use your little shovel to get down to the bottom of the container and get all the crumbles and mix.
****I want to stress here that concrete dust can be dangerous. If you don't have previous experience mixing concrete and have never handled it before, wear a dust mask and gloves. It also dries your skin out badly so gloves are recommended anyway. When you pour the mix into the bucket, try to minimize dust production in the first place.****
| You can even probably find someone to do all the "heavy lifting" - and mixing - for you. |
| Before mixing. |
| Just started mixing. |
| Almost there. |
| Sill a little rough at this point and could have used some more water. |
Place your chicken wire on top and gently press down. Be careful not to poke or cut yourself with any cut wires.
Glob more concrete on top of the chicken wire to make another layer 1" to 1.5" thick. Pat smooth again so any more bubbles will be released.
Use the plastic to "round" the edges of your soon-to-be garden decoration. Do this by lifting the edges of the plastic and using your hands to pack and pat the concrete. This will help give it a nice smooth edge instead of a crumbly, jagged one.
| Crumbly edge. Let's firm that up! |
| See this awesomeness? Ah, yeeeaah. |
Now. The hard part. You have to wait for the concrete to do it's thing. Let it harden, or cure, depending on what kind of concrete or cement mix you're working with. The bag will give you the details. After about 24 hours, I was able to flip mine over and move it into the sun where it can cure and where the leaf will dry out faster. (more pix to come once it's in the garden!)
Once it's dry and you can't leave marks in it, remove the leaf. If you have a hard time getting the bits out, try a stiff bristled scrub brush, or just leave it - the weather will eventually take care of it for you.
| Here she is! I haven't scrubbed all the bits off, just gotten off what I could with my hands. |
Want to check out some other resources before you commit yourself to my process? I don't blame you! Check out Suzie Homefaker's blog for more info on how to color your concrete or the Gardens West website. You can also just do a google image or google web search, but make sure you have your antivirus program running in case you run into some malware along the way (I did). Avast Antivirus is free and is a great antivirus program. I've been using it for years.
So head outside when the weather's nice and make yourself some stepping stones! If you have a question, please feel free to comment! I love to get comments and interact with you!
May 15, 2013
Wednesday Child - Crocheting With Beads
Ladies and
Gentlemen…start your engines! Today I
will demonstrate crocheting with beads.
I am using #10 crochet thread, 5 6mm beads, a collapsible big eye beading needle, 6mm
glass pearls (This is just what I’m using.
You can use any bead you want as long as the hole is large enough.), and
a vintage #7 Susan Bates steel hook.
For other projects, you need to know the amount of beads you will be using on
your project; but if you don’t know, it’s better to have more than you will
probably need. For this demonstration you will need 5 beads. The first thing you will
do is to string all of your beads onto the thread by using the beading needle (it’s a bother, but you will
have to keep pushing the beads away as you work until you’re ready to start
beading).
A regular small eye needle will not work and it’s better to invest the paltry
sum of money into the collapsible needles than to waste your time trying to
make something else work. I know from
experience.
For your reference:
dc = Double Crochet
ch = Chain
sk = skip
st = stitch
sc = single crochet
Enough talk! Let’s do a very small sample: Thread 5 beads and chain 12
1. Dc into the 4th ch from the hook, *ch1 and sk
1 ch st, dc in next ch st*. Repeat from
* to*. You will have 6 dc (counting the
first 3 skipped ch st) and 5 ch1 spaces.
Turn.
2.
Ch1 (now here is where we start adding the bead to our crochet!), *slip
your hook under the ch1, through the ch1 space.
Slide a bead down, yo the hook and pull the thread back through the ch1
opening. You should have 2 loops on your
hook.
Make sure to push the bead under the hook toward the front, leaving the two loops in back. Yo and pull thread through both loops.
Sc in next dc* and repeat from * to *, sc in top of last ch3. Finish off.
You should now have 5 single crochet beads and 6 single crochets
(counting first chain 1).
Here is a tutorial video that may be of help as well. https://www.youtube.com/watch?v=8MbLCuyfv-M
I hope my pictures are more helpful than confusing. If you need more help or want to add
anything, leave me a comment. I would
love to hear from you.
March 31, 2013
The Sassy and Classy Tutu Dress Tutorial - PART 3: Skirt Construction and Finishing
Hi, everyone, and thanks for joining me for Part 3 of the
Sassy and Classy Dress Tutorial: Skirt Construction and Finishing!
At this point, you should already have your bodice put
together. If you don’t, check out Part 2 of this tutorial series. If you haven't started yet and need to catch up, go back to Part 1 for material prep.
Let’s get down to business!
To make a super full tutu – one that fluffs out rather than
one that just hanging down semi-flat – you’ll need a lot of tulle and a little
patience. For this skirt, I used 5 yards of black tulle (4 will work just fine), and probably ½ yard
of shimmery white (who knew there are different kinds!). I also used a square
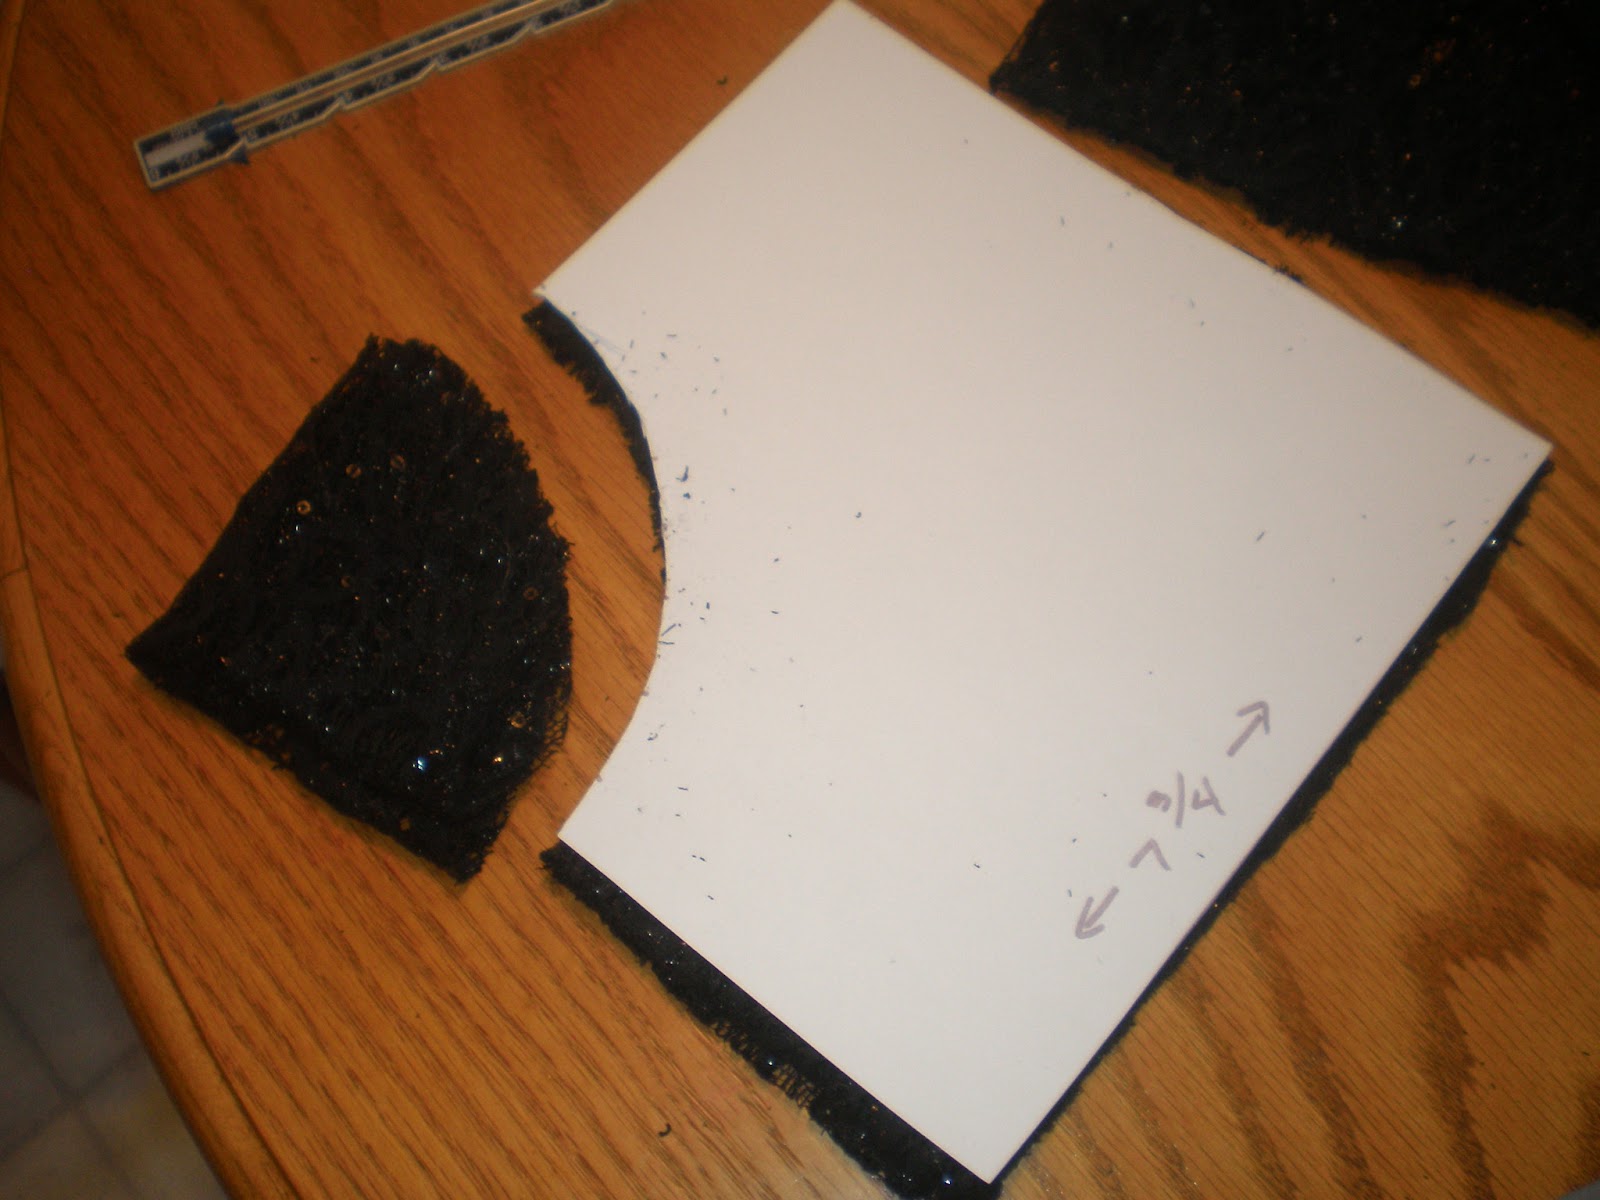
of stretch lace cut to about 15.5”x15.5” with a nice round circle cut out of the
middle. I used it to lay over the skirt for 1) visual interest, and 2) to put a
little weight on the fluffy tulle.
| A 15.5"x15.5" square of stretch lace folded into fourths and the middle cut out. Hint: Fold into fourths and then cut out on the corner. |
First, fold your tulle in half the long way. This will give
you a 28” piece to cut rather than a 56” piece. Then fold the short way a few
times until you get a 28” wide piece of tulle that’s manageable for you. Remember,
there’s no need to be super- finicky since the unevenness gives the skirt more
personality. From the fold opposite the selvages, measure 4” and pin the length
(this will give you an 8” strip). Then measure over 8” and pin the length
again. Do that two more times. Your tulle should look like this:
| Selvage is on the left side, long fold is on the right side. Pins are at 8", 8", 8", and 4" |
Cut your tulle into strips by cutting along your line of
pins (but don’t remove the pins until you're ready to sew - this will keep them from being all over the place). You should have eight 8”x 180” wide strips of tulle all nicely
folded and manageable with pins still attached.
| Pinned 8" wide strip of tulle. |
Let’s head over to the sewing machine and get it ready for
ruffling!You can take your pins out now.
Put your bobbin thread in first (because once you put on the
ruffler foot attachment you won’t be able to without taking it back off). Attach
your ruffler foot and thread the needle. Set your ruffler to make the biggest
tuck with the most number of stitches between tucks. Now adjust your machine to
make long straight stitches (~5mm). Ruffle away with a 5/8” seam allowance and be
astounded at how easy this little (big!) foot attachment can make sewing life
so easy!
If you don’t have a ruffler foot, you can gather the
material by sewing a long straight stitch and then pulling on the top thread to
scrunch up the tulle – takes a little more time but it gets the job done. Sorry I don’t have a pic of this part. My 3
year old ran off with my camera to become my project photographer (not bad, eh?).
I ruffled each piece of tulle separately and then, using a
long straight stitch and my regular sewing foot and a seam allowance of 5/8”,
joined each piece of tulle with an overlap of about 1/2 yard. For example, when
I got to the last ½ yard of my first piece, I added my second piece. When I got
to the last ½ yard of my second piece, I added my third, and so on. As I
stitched along, I added tufts of white tulle (9"x9" squares, scrunched up) into the skirt to give it some pizzazz.
You can put it on top of the black tulle, under the tulle (harder, or in between tulle ruffles when you're overlapping. I should have used more - at least the whole yard. You’ll learn from my mistake, right? ;o)
| White tulle. |
| White tulle all scruched up and ready to place in the seam |
| Ready to sew in the tuft of white tulle. |
| White tulle sewn in (look behind the foot). |
In the end, you’ll have a long, super-ruffle like this that
your kids can play with as you watch with both awe and horror:
Here’s where it might get confusing (because I’m not sure
how to explain it). Measure the front of your bodice. Multiply that number by
two. That’s the circumference of the
skirt you’ll need. So take this measurement and a tape measure and measure that
length from one end on your super-ruffle. Mark with a pin. Fold at the pin so
that the end of your super-ruffle meets the pin and re-pin.
There are a couple ways to sew this skirt: 1) You can fold
your super-ruffle around and around and pin so that you only have to fight with
the ruffles once OR you can 2) just sew around and around and around on your
sewing machine until your skirt is done. I chose the first way.
| All pinned up! |
| Ready to sew. |
| So FUNtastically fluffy! |
Now that the tulle is all sewn in a nice circle, I added my
stretch lace on top, with wrong side of lace to right side of tulle. Sew with
that same 5/8” seam allowance.
| Stretch lace pinned on and ready to sew. The corners of the lace are pinned down so they'll stay out of the way as I sew. And, yes, the skirt really is standing up like that all by itself. Poofy! |
| Close up. Ignore the binding lace on the inside edge. Experiment gone horribly wrong. |
Pin skirt to bodice, right sides together. Sew skirt to bodice with a 5/8” seam allowance.
| Skirt pinned to bodice. Again, ignore the lace binding. Horribly wrong. |
| I basted, and then sewed. Made it easier for me. |
I would recommend serging the seam here just to make sure it’s
not uncomfortable, but I didn’t do that on this specific project.
AAAAAAAAAAAAAND We’re done! WOOHOO! You now have a super cute
Sassy and Classy Tutu Dress for your own little special someone! **There are probably easier ways to do this
than I’ve done, but I never said I take the easy way around, haha.
| Don't forget to clip stray threads. |
I hope you enjoyed my tutorial, even though this third part was a little long. If you make a tutu dress from this tute, I would absolutely LOVE to see pics! Please leave a comment if you have a question, if I left something out, or you just want to say something nice. I love reader comments!
Subscribe to:
Posts (Atom)