Analytics

Blog Template

Pinterest

Showing posts with label sewing. Show all posts

July 13, 2013

The Brooklyn Frock - A Pattern Review

The pattern: The Brooklyn Frock
The designer: The Peek-a-boo Pattern Shop
Cost: Free
Special skills: Bias binding, gathering, button placket, button loops
Cut + First sew time: 2.5 hours
My sample size: 3T

Over the last few days, I've gotten the chance to finally sew up a couple of these cute little dresses. If you're looking for a cute little dress that's quick and easy to sew up, this one is a pretty good fit. I really love the asymmetry of this design and how you can fab it up with really funky fabrics or chill it out with sweet little prints like the ones I used.

Yardages/Cutting: It only takes about ten minutes to configure the pattern pieces and get the pieces cut out, especially if you're cutting out smaller sizes. The pattern pieces are clearly marked/labeled with what they are, how many to cut, and whether or not to cut on the fold. Yardage requirements are pretty accurate, but it can't hurt to buy an extra 1/3 yard just in case you forget to do a layout before you cut (the designer recommends laying out first). If you lay out your pieces prior to cutting, you will have less fabric waste and may even have a nice usable scrap left over. Because of having to cut both main pieces of the dress on the fold of such a small piece of fabric, it would have been nice to just have a cutting layout included in the pattern. Not a deal breaker.

Special Techniques: Most of the instructions are very clear, though you do need some experience, or at least access to information or techniques, to accomplish some of the detail on this dress. One of the special skills you will need for this dress is how to attach double fold bias tape. Attaching bias tape is not something explained in the instructions so you might have to pull out that dusty sewing book or hit up YouTube for some instruction. I've only used bias tape one before so I had no idea what I was doing the first time around on this dress. Another special technique used on a major part of this dress is gathering. There are two or three different ways to accomplish this, so brush up on whichever way you like best and have at it. Buttons and button plackets are another detail used here, though I'm not sure the type used on this dress is an actual placket since it's done more like a keyhole here.

Sewing: This pattern goes together pretty quickly once you know how to do all the techniques mentioned above. First sew time (the time it took to get through the whole pattern the first time) was about 2.5 hours.

One of the drawbacks to this pattern is that notches aren't included in the sleeve pattern pieces. This makes gathering at the shoulder and at the bottom of the sleeve a little more difficult since they're supposed to be isolated to the centers. Pocket placement could be marked. The sleeve binding also gave me some issues due to how they're sewn together. The instructions tell you to attach the binding and then sew the sleeve and dress sides together at once. The finish would look nicer if the sleeve and dress sides were sewn and then the bias was attached - but this would require that you know how to finish a bias binding. Completing this step the correct way would probably make the dress sleeve more comfortable for the wearer and it would look nicer, too. Although I didn't change the pattern in any way, I would add a little something around the bottom edge - maybe more binding.


June 15, 2013

This week's project

I've been totally pulled away from sewing the last couple of weeks and it's been completely awful. My days have been filled with work, and my evenings and weekends have been packed with activities for the kids. But this week, I'm dedicated to putting something together.

A few weeks ago, I got a cute pattern from the Peek-A-Boo Pattern Shop called the Brooklyn Frock. The Brooklyn pattern includes sizes three months to eight years old and it looks like it's still being offered for free on the website so go download it!

Image of Brooklyn Frock: 3 mos. - 8 years

I bought enough fabric to make two dresses, so I should be ready to go. Except for the buttons, which I'll get today since I will be out and about yet again.

Look for a post next Saturday on how the first one turns out.

May 11, 2013

A Broken Blade

You know how all the sewing experts tell you not to run over your pins while sewing? Sometimes I do and sometimes I don't. But this time, I was really trying to be good and remove all the pins. Plus I was using a serger, and you kind of have to if you don't want to damage something.

But, as awesome as I am, there was a pin hidden between the layers of fabric I was serging together. I was almost finished with a dress when it happened. BAM! The upper cutting blade snapped and flew at my face (it would have gone right over my head if I'd been sitting) and plunked me in the forehead. It didn't hurt and my ego wasn't nearly as damaged as my blade.

I took to the Internet and tracked down some parts that were supposed to be compatible with my machine and then decided to just wait until the next day to find the parts locally. So I went to bed. I even dreamed about the parts. Weird.

I called a few local shops including one I really dislike dealing with. She quickly insulted me by saying my machine might be considered "disposable" and she might not be able to get the replacement blade. Then she told me it would take an entire week just to research to see if she could get the part. Plus two weeks to then GET the part. I called a different shop and he called his supplier and called me 10 minutes later. He could get but wanted to wait until he put in his next big order.

So I just called Brother, the manufacturer. Why didn't I just do that in the first place? I like to support local businesses and it's nice to get the part you need right away. Turns out it would only take three days to get the part I needed.  And, as a bonus, I ordered a part for my sewing machine that was damaged by a ruffler foot attachment. Now I'll have to try out the replacement foot attachment that Hancock sent me and see if it damages the new part - Look for an update to that post soon. ;)

May 8, 2013

Wednesday's Child - Welcome, Wendy!

I want to welcome super-talented Wendy to Sew the Line! Today is her first blog post ever, but I think you'll be happy to the variety that she'll bring to the blog. She's an avid crocheter, and dabbles in art, sewing, and lots, lots more. Welcome, Wendy!

**********************************


Welcome to “Wednesday’s Child!” Let me introduce myself. My name is Wendy.  There are several reasons I’m calling today’s blog Wednesday’s Child:  1) Obviously, it’s Wednesday. Duh. 2) I love all things baby and children. 3) I was born on a Wednesday. 4) It sounds a lot like Wendy. 5) I just like the name!  ‘Nuff said.

I am the mother of three grown children of which I am very proud and three granddaughters of which I am equally proud.  I like to spend my time crocheting whatever takes my fancy but mainly I like to crochet baby items. Especially fancy baby items. The lacier, frillier, and frou-frou, the better. My sister-in-law calls me a foo-foo girl. Guilty as charged! I like to think of it as “romantic” style. 

I taught myself to crochet when I was in my early 20’s. Whenever I went to visit a friend, inevitably someone would always have a brightly colored afghan hanging over the back of the couch. ‘Ooooh…I want one of those.’ When I would ask about the afghan I was told “My grandma made it.” Then I would find out she could make me one too, but for a price. I had no money. My husband and I barely had two nickels to rub together! So, I went to a craft store, bought a book, some hooks, and some yarn and made my own afghan. Then I made some more. I really didn’t have a lot of spare time, so it wasn’t until a few years ago I was able to pursue making more than an afghan.

Wednesdays will hopefully be spent talking about my favorite subject: crochet! If you have questions, I will do my best to answer. If I don’t know, I’ll find out. I might even talk about what else interests me such as ballet, knitting, sewing, painting, drawing, embroidery, cross stitch…dada…dada…ya…ya…ya.  I will do my best to take pictures. That being said, next week I will try to instruct you, gentle reader, on the art of crocheting pearls!


May 7, 2013

Off Topic Tuesday - The Winds of Change

They're roaring! But I can hear them loudest when I open my closet door.

Up until now, I've been pretty happy over the last three years to not have to change out of my pajamas if I didn't feel like it and I wasn't going anywhere. Big, soft cotton tees became my best friends, along with my favorite pair of yoga pants.

Three years, three girls, and a few pregnancy-induced body changes later, I need an entirely new wardrobe to accommodate a new job I've just been offered (Whee!). But don't worry. I won't leave you. I love to share on my blog and I love to sew and since I usually do both at night anyway, I don't suspect much of a change in that aspect of my life.

This past weekend, I went shopping with my mother-in-law. She's a shopper. I'm not. My most favorite place to shop for professional clothing is EXPRESS. I hadn't been in one since probably 2009. As soon as I walked into that store I had what I like to call EXPRESS overload. Everything looked immaculate and trendy and oh-so-fabulous. As I tried on regular length pants (way too long for this short-stuff), waist-peplum tops, and some of the flow-ier summery clothes, it all came crashing down and I realized I just can't wear the same things I could wear 3 or 4 years ago.

With this in mind, I've begun a search for trendy, professional clothes to sew for myself. I'd like to add at least one or two perfectly fitting pieces to my closet every month, which might be a pretty hefty goal at first. But I did walk out of EXPRESS, Macy's, and Target with some cute tops, pants, and even a dress and a sweater to get me started.

I plan to take a couple of Craftsy classes, maybe some private sewing classes, and from some alterations sites I've come across. If you have any suggestions for web-sites, online classes, or even cute office-appropriate outfits, I would love for you to leave a comment.

***Oh - and don't forget - tomorrow we welcome Wendy to the blog as a writer! Look for her first post!

April 6, 2013

Ruffling Foot Attachment - A Review

**This article has been updated. Please see end of post for updates.**

In December 2012 I finally bought a little gadget for my sewing machine that I'd had my eye on for quite a while. It's called a ruffling foot and it's kind of scary looking, like it doesn't belong anywhere near a sewing machine. I got mine at Hancock Fabrics. It's made by Creative Sewing Solutions (but you can only get it through Hancock's).

Crazy, right?


But as I started using it, I realized how ridiculously amazing and time-saving this foot attachment could be. The first project I tested it on was a rather small one - a set of decorative holiday trees to sell at a local craft shop.

It did an amazing job and made super fast work out of making smaller pleats in long strips of beautiful (and thick) jacquard. I think they turned out rather pretty, if I do say so myself (and I do, of course!).

But then I stuck the contraption in a drawer where it patiently waited to be used again. Two months went by and I got it out once again to use on Liv's Sassy and Classy Tutu Dress.

Again, it just amazed me how easy it made the task of ruffling up some tulle for the tutu dress. And tulle is a completely different animal than the jacquard I used on the trees, so I was even more impressed.

You can see the ruffles made with the ruffling foot here.
And all was well and good until I noticed something rather disturbing. I'd gotten something in my hand while I was working on the tutu ruffles and it just kept getting more and more irritated. So I looked at my hand and there was a tiny splinter. I kept looking at it trying to figure out where I'd gotten a splinter and I was thinking that it didn't feel like a wood splinter (do different kinds of splinters feel different to you?), but it did feel like a metal splinter.

So I began to examine my machine and noticed tiny metal shavings on the platform between the throat plate and the housing. "Where the heck did those come from!?" I internally shouted. By now I was actually kind of panicking because I have no idea how to repair a sewing machine with a computer. Then I found it.

This.


And from another angle:


That's my needle clamp screw housing and I'm pretty sure it can't be replaced. How did this happen? Well, in order for the ruffling foot to ruffle, that 'C' shaped part goes on the needle clamp screw housing. As the needle moves up and down, it hits the 'C, which causes the ruffling foot to do its thing. Unfortunately, it really wore on my machine. This is after about ... maybe about 40 yards of tulle ruffling.

And not only did it damage the needle screw clamp housing, but because the table top machine is so lightweight and can't be secured to the surface it's on, the foot actually caused enough vibration to
break the needle loose once or twice. Luckily - as far as I know - it didn't cause any damage to the bobbin area. In addition, the ruffling foot vibrated so much during use that the settings actually changed themselves while I was working so the ruffles would be more like tiny pintuck pleats than ruffles.

Negative stuff aside, I REALLY LOVE LOVE LOVE the idea of using a ruffling foot, but this one just doesn't cut it with regard to my machine.

Please learn from this - ALWAYS READ THE REVIEWS BEFORE YOU BUY - if you can find them! It look like this foot has been discontinued by Hancock's. Maybe lots of people have had the same problems.

I would love to hear any feedback on how YOUR ruffling foot does for you!

Good luck with your ruffling adventures!

**Right after I wrote this post, I contacted Hancock Fabrics about the problem. I promptly got a response and they worked with me to find a solution to my problem. In the end, they decided I bought the wrong foot (pretty dang sure I didn't, btw) and told me they wouldn't repair my machine. But they did exchange my ruffler foot for one they said is the right one. It doesn't look different to me. And it didn't look different to the wonderful ladies at my local Hancock store, either. Once I get my machine repaired, I'll give the new foot a go and see if the same thing happens. Then we'll know for sure.**

March 31, 2013

The Sassy and Classy Tutu Dress Tutorial - PART 3: Skirt Construction and Finishing


Hi, everyone, and thanks for joining me for Part 3 of the Sassy and Classy Dress Tutorial: Skirt Construction and Finishing!

At this point, you should already have your bodice put together. If you don’t, check out Part 2 of this tutorial series. If you haven't started yet and need to catch up, go back to Part 1 for material prep.

Let’s get down to business!

To make a super full tutu – one that fluffs out rather than one that just hanging down semi-flat – you’ll need a lot of tulle and a little patience. For this skirt, I used 5 yards of black tulle (4 will work just fine), and probably ½ yard of shimmery white (who knew there are different kinds!). I also used a square of stretch lace cut to about 15.5”x15.5” with a nice round circle cut out of the middle. I used it to lay over the skirt for 1) visual interest, and 2) to put a little weight on the fluffy tulle.
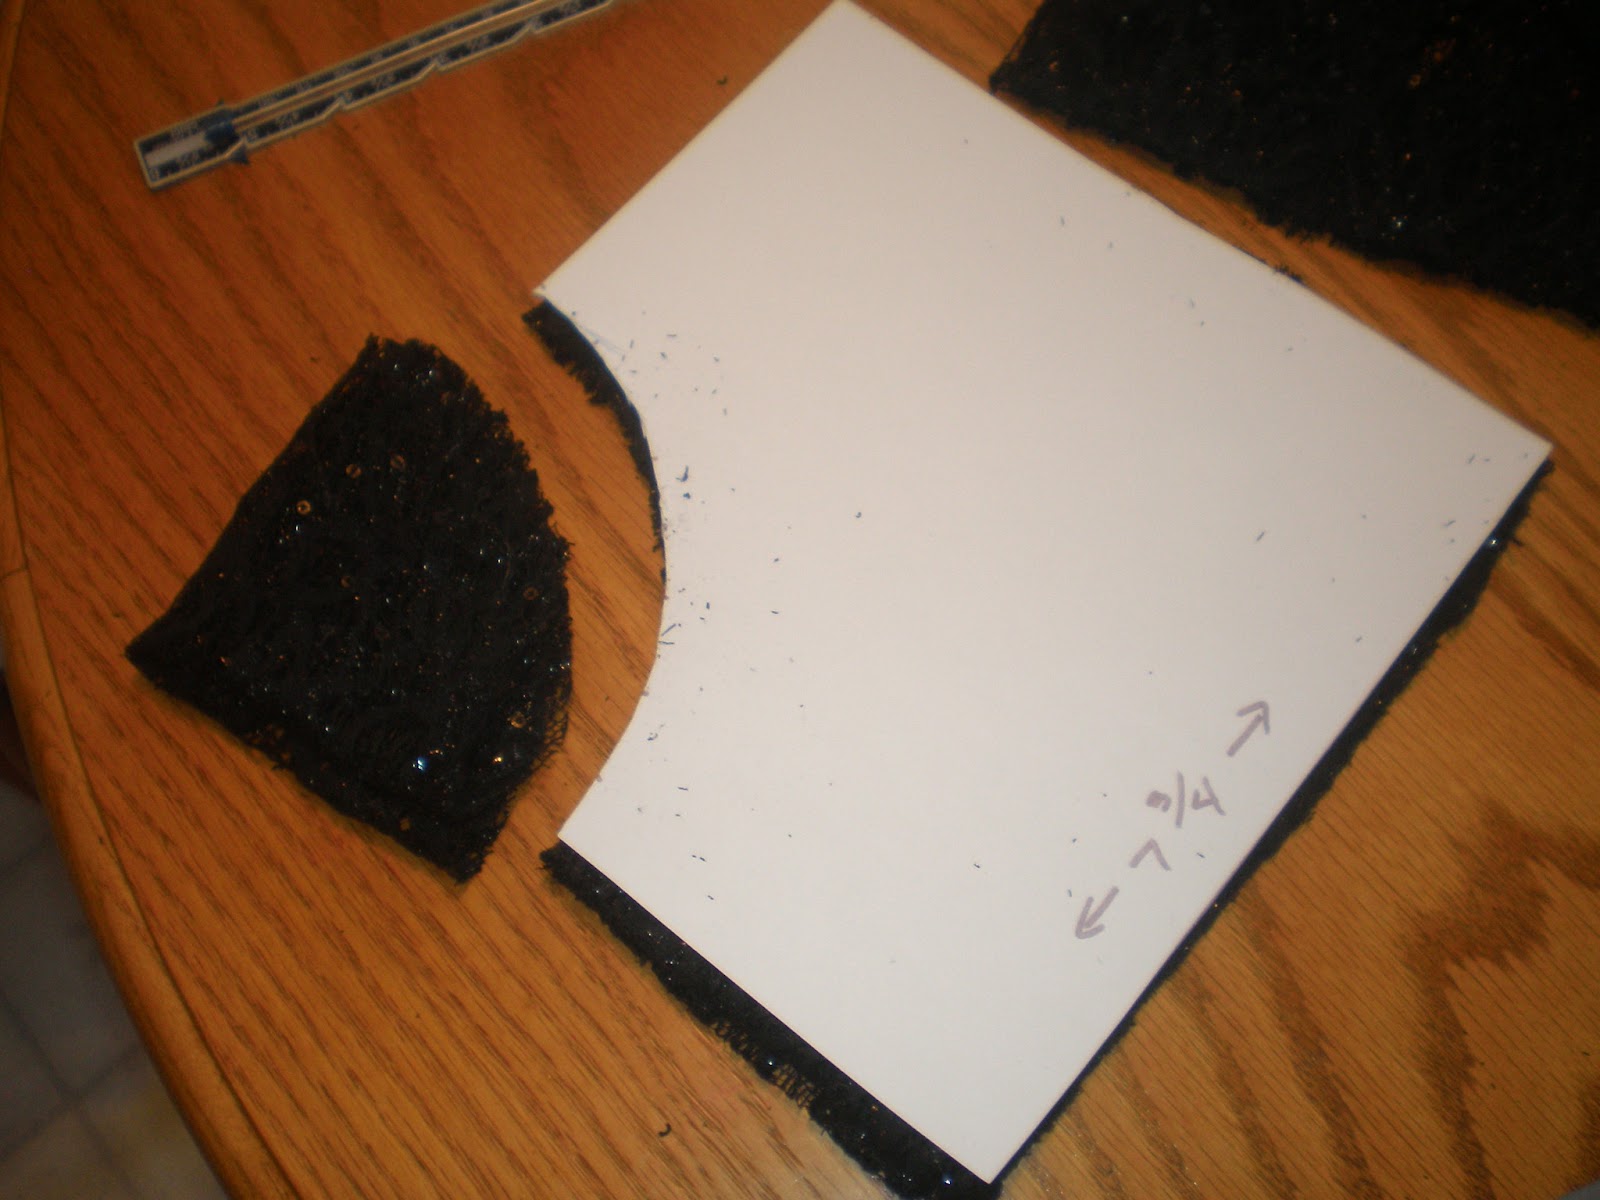
A 15.5"x15.5" square of stretch lace folded into fourths and the middle cut out. 
Hint: Fold into fourths and then cut out on the corner.


First, fold your tulle in half the long way. This will give you a 28” piece to cut rather than a 56” piece. Then fold the short way a few times until you get a 28” wide piece of tulle that’s manageable for you. Remember, there’s no need to be super- finicky since the unevenness gives the skirt more personality. From the fold opposite the selvages, measure 4” and pin the length (this will give you an 8” strip). Then measure over 8” and pin the length again. Do that two more times. Your tulle should look like this:

Selvage is on the left side, long fold is on the right side. Pins are at 8", 8", 8", and 4"

Cut your tulle into strips by cutting along your line of pins (but don’t remove the pins until you're ready to sew - this will keep them from being all over the place). You should have eight  8”x 180” wide strips of tulle all nicely folded and manageable with pins still attached.

Pinned 8" wide strip of tulle.


Let’s head over to the sewing machine and get it ready for ruffling!You can take your pins out now.

Put your bobbin thread in first (because once you put on the ruffler foot attachment you won’t be able to without taking it back off). Attach your ruffler foot and thread the needle. Set your ruffler to make the biggest tuck with the most number of stitches between tucks. Now adjust your machine to make long straight stitches (~5mm).  Ruffle away with a 5/8” seam allowance and be astounded at how easy this little (big!) foot attachment can make sewing life so easy!

If you don’t have a ruffler foot, you can gather the material by sewing a long straight stitch and then pulling on the top thread to scrunch up the tulle – takes a little more time but it gets the job done.  Sorry I don’t have a pic of this part. My 3 year old ran off with my camera to become my project photographer (not bad, eh?).


I ruffled each piece of tulle separately and then, using a long straight stitch and my regular sewing foot and a seam allowance of 5/8”, joined each piece of tulle with an overlap of about 1/2 yard. For example, when I got to the last ½ yard of my first piece, I added my second piece. When I got to the last ½ yard of my second piece, I added my third, and so on. As I stitched along, I added tufts of white tulle (9"x9" squares, scrunched up) into the skirt to give it some pizzazz. You can put it on top of the black tulle, under the tulle (harder, or in between tulle ruffles when you're overlapping. I should have used more - at least the whole yard. You’ll learn from my mistake, right? ;o)

White tulle.
White tulle all scruched up and ready to place in the seam
Ready to sew in the tuft of white tulle.
White tulle sewn in (look behind the foot).

 In the end, you’ll have a long, super-ruffle like this that your kids can play with as you watch with both awe and horror:


Here’s where it might get confusing (because I’m not sure how to explain it). Measure the front of your bodice. Multiply that number by two.  That’s the circumference of the skirt you’ll need. So take this measurement and a tape measure and measure that length from one end on your super-ruffle. Mark with a pin. Fold at the pin so that the end of your super-ruffle meets the pin and re-pin.

There are a couple ways to sew this skirt: 1) You can fold your super-ruffle around and around and pin so that you only have to fight with the ruffles once OR you can 2) just sew around and around and around on your sewing machine until your skirt is done. I chose the first way.
All pinned up!

Ready to sew.


So FUNtastically fluffy!

Now that the tulle is all sewn in a nice circle, I added my stretch lace on top, with wrong side of lace to right side of tulle. Sew with that same 5/8” seam allowance.
 
Stretch lace pinned on and ready to sew. The corners of the lace are pinned down so they'll stay out of the way as I sew. And, yes, the skirt really is standing up like that all by itself. Poofy!

Close up. Ignore the binding lace on the inside edge. Experiment gone horribly wrong.

 Pin skirt to bodice, right sides together. Sew skirt to bodice with a 5/8” seam allowance.

Skirt pinned to bodice. Again, ignore the lace binding. Horribly wrong.

I basted, and then sewed. Made it easier for me.

I would recommend serging the seam here just to make sure it’s not uncomfortable, but I didn’t do that on this specific project.

AAAAAAAAAAAAAND We’re done! WOOHOO! You now have a super cute Sassy and Classy Tutu Dress for your own little special someone!  **There are probably easier ways to do this than I’ve done, but I never said I take the easy way around, haha.


Don't forget to clip stray threads.

I hope you enjoyed my tutorial, even though this third part was a little long. If you make a tutu dress from this tute, I would absolutely LOVE to see pics! Please leave a comment if you have a question, if I left something out, or you just want to say something nice. I love reader comments!
Related Posts Plugin for WordPress, Blogger...