Showing posts with label crochet. Show all posts
February 1, 2014
Free Pattern - Boucle Headband and Cowl Set
To get myself through the last few months of winter (so sad!), I felt like I needed something new and pretty. My scarf, even though I really love it, can be burdensome because of the length. About a year ago, I bought some yarn I just loved from which to make a slouch hat. Unfortunately, the pattern I was using didn't make a whole lot of sense and I never got it done. I was in headband making mode, so I thought I would whip this little set up.
Enjoy!
Boucle Headband and Cowl Set (adult size)
Materials:
Lion Brand Silky Twist in Linen (2 5oz. balls)
Size N crochet hook
Yarn Needle
Large Buttons (optional)
Stiches:
ch = chain
dc = double crochet
dc2tog = double crochet two together
Headband:
Ch7
Row1: In second ch from hook, dc in each ch across. Ch 3. Turn. (5)
R2: Dc in first two stitches, 2dc in third stitch, dc in last two stitches. Ch 3. Turn. (6)
R3: Dc in each stitch across. (6)
R4: Dc in first three stitches, 2dc in fourth stitch, dc in last two stitches. Ch 3. Turn. (7)
R5: Repeat R3 (7)
R6: Dc in first three stitches, 2dc in fourth stitch, dc in last three stiches. Ch 3. Turn. (8)
R7: Repeat R3 (8)
R8: Dc in first three stitches, 2dc in fourth stitch, dc in last four stiches. Ch 3. Turn. (9)
R9: Repeat R3 (9)
R10: Dc in first four stitches, 2dc in fifth, dc in last four stiches. Ch 3. Turn. (10)
R11: Repeat R3 (10)
R12: Dc in first four stitches, dc2tog, dc in last four stiches. Ch 3. Turn. (9)
R13: Repeat R3 (9)
R14: Dc in first three stitches, dc2tog, dc in last four stitches. Ch 3. Turn. (8)
R15: Repeat R3 (8)
R16: Dc in first three stitches, dc2tog, dc in last three stitches. Ch 3. Turn. (7)
R17: Repeat R3 (7)
R18: Dc in first two stitches, dc2tog, dc in last three stitches. Ch 3. Turn. (6)
R17: Repeat R3 (6)
R16: Dc in first two stitches, dc2tog, dc in last two stitches. Ch 3. Turn. (5)
R17: Dc in each stitch across. (5) Do not fasten off. First, test the headband around your head to make sure it would fit. If you need to add more length, repeat row 3 until long enough.
Once headband is long enough, fasten off, leaving a long thread for sewing.
To sew the ends together, use a mattress stitch. (It can be tough with this yarn, but if you do your best, it should be fine). Weave in ends.
Alternatively, you can fasten off and weave in as usual and then add a large button to one end. To fasten just slip the opposite end over the button.
Cowl:
Ch22
Row 1: Dc in second chain from hook and each chain across. Ch 3. Turn. (20)
R2-36. Dc in each st across. Ch 3. Turn. (20)
R37: Dc in each st across. (20) Do no fasten off. Test the cowl around your neck to make sure it drapes down as far from or as close to your neck as you would like it. If you need to add more length, repeat row 2 until it's until long enough.
Once the cowl is the size you want, fasten off, leaving a long thread for sewing.
Sew the ends together using a mattress stitch. Weave in ends.
Alternatively, you can fasten off and weave in as usual after the last row and then add two or three large buttons to one end of the cowl. To fasten just slip the opposite end over the buttons.
Show me yours!
Questions, comments, or see a mistake? Leave a comment for me.
January 8, 2014
Wednesday's Child: Something Old, Something New
You know the old saying about everything that goes out of style always comes back? Out of style for decades, it appears they are now in style again. I’m talking about beautiful beaded doilies which are used as jar covers and as accents on glassware. For some reason I am so inspired by them! Some time ago I stumbled onto a picture of a crochet cake cover and fell immediately in love. I searched the internet for the cake cover pattern and always it would take me back to the same site; http://heirloomtreasuresfiberarts.com/heirloom-heritage-techniques. While I enjoyed the site, I never found a pattern for this beautiful cake cover.
In my quest to find the ever-elusive crochet cake cover I ferreted out some beaded jar patterns. The really neat thing about the beaded jar covers is they are not only pretty; they can be practical as well. Imagine a dainty little jeweled doily covering your pitcher of iced sweet tea, keeping it bug-free while you sit on the front porch with friends. If you don’t crochet, I found this idea from http://www.pompomemporium.com/content/how-upcycle-a-cotton-doily:
This is a free pattern for you to download and she not only gives you the pattern, she also has a section which tells you how to do the blocking. It would not be hard to make a fashion statement on your table with these. Beaded covers make the ordinary appear extraordinary!
This vintage pattern below is free from: http://www.knitting-and.com/crochet/jugcover.htm It’s originally from the 1940’s. It is so cute with a little crochet cup and saucer on top and would make a charming display in a kitchen.
But why stop at jug and jar covers? Can’t you just see little crochet beaded snowflakes sparkling from a Christmas tree branch, hanging from a nylon thread in a window, or even from a ceiling, as the beads catch the light? How cool would that be?! Or what about making coasters for parties? How about beaded “skirts” for wine glasses. Throw one over your pie dish or bowl of potato salad! They would make nice gifts too. For those who can’t or don’t want to crochet, what could be easier than to buy one from an internet store such as Etsy or E-bay?
There are even books available with a number of different patterns.
It’s time to re-enjoy old fashioned ideas and traditional crochet by making something updated and fun! If you have some ideas or some cool pictures of how to use beaded doilies, don’t hesitate in letting me know. Who knows, maybe I’ll do a post on it!
In my quest to find the ever-elusive crochet cake cover I ferreted out some beaded jar patterns. The really neat thing about the beaded jar covers is they are not only pretty; they can be practical as well. Imagine a dainty little jeweled doily covering your pitcher of iced sweet tea, keeping it bug-free while you sit on the front porch with friends. If you don’t crochet, I found this idea from http://www.pompomemporium.com/content/how-upcycle-a-cotton-doily:
In charity shops you can often see a pile of doilies languishing unappreciated in with the linens, it's a shame as obviously a lot of time and effort went into hand-crocheting these cotton doilies. Pondering their plight I had the idea of up-cycleing them into jug/bowl covers, to keep flies off food and drink in summer. All you do to give them a new lease of life is attach, by sewing, glass beads* around the edge.I found the Bourbon Rose Jug/Bowl Cover here: http://megan.cc/BowlCover/
*Glass ones have more weight than plastic ones.
This is a free pattern for you to download and she not only gives you the pattern, she also has a section which tells you how to do the blocking. It would not be hard to make a fashion statement on your table with these. Beaded covers make the ordinary appear extraordinary!
This vintage pattern below is free from: http://www.knitting-and.com/crochet/jugcover.htm It’s originally from the 1940’s. It is so cute with a little crochet cup and saucer on top and would make a charming display in a kitchen.
But why stop at jug and jar covers? Can’t you just see little crochet beaded snowflakes sparkling from a Christmas tree branch, hanging from a nylon thread in a window, or even from a ceiling, as the beads catch the light? How cool would that be?! Or what about making coasters for parties? How about beaded “skirts” for wine glasses. Throw one over your pie dish or bowl of potato salad! They would make nice gifts too. For those who can’t or don’t want to crochet, what could be easier than to buy one from an internet store such as Etsy or E-bay?
There are even books available with a number of different patterns.
It’s time to re-enjoy old fashioned ideas and traditional crochet by making something updated and fun! If you have some ideas or some cool pictures of how to use beaded doilies, don’t hesitate in letting me know. Who knows, maybe I’ll do a post on it!
January 2, 2014
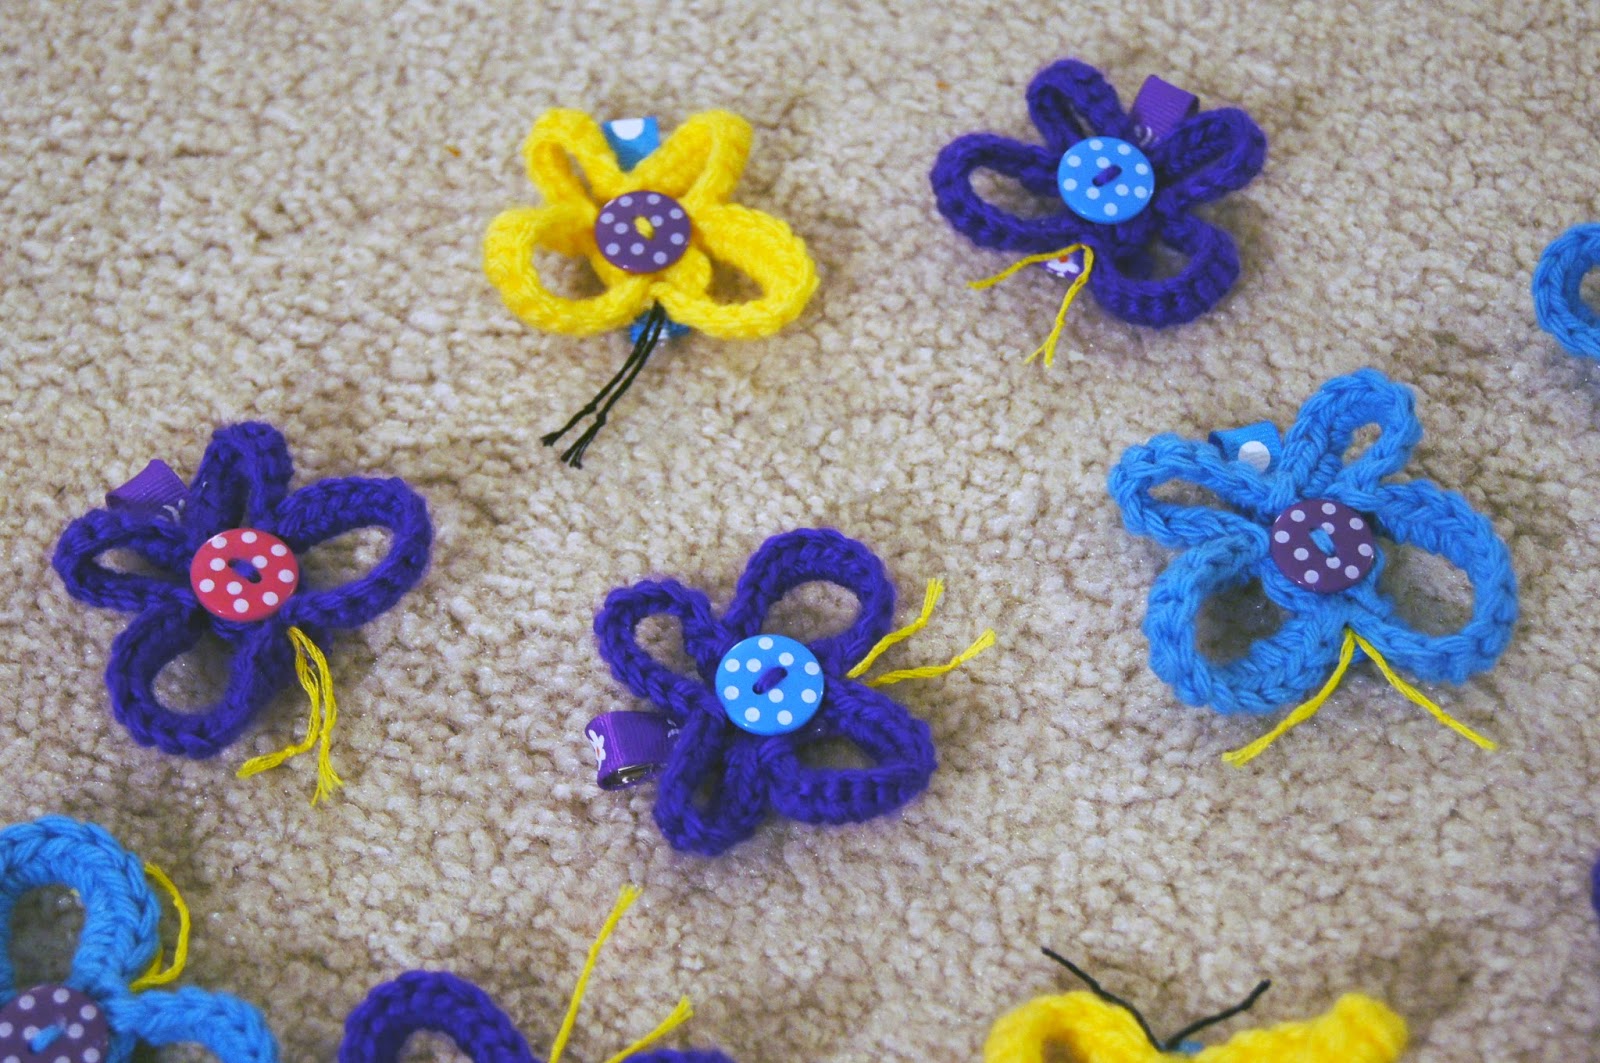
Making Ribbon-Covered Butterfly Hair Clips
I haven't been around here for a while, so I thought I would give you something nice. A ribbon-covered butterfly hair clip in six steps.
I came across a crochet butterfly pattern a few months ago called from Everlaughter by Patricia Eggen. She mostly does appliques, but also has a few other patterns for sale. The butterflies really caught by eye, so I saved the pattern because I knew I would find a way to use it.
And so I did.
We're having Katie's and Ivy's birthday party this Saturday, and since I made ribbon rainbows last year for the Rainbow Party, I thought I would continue the tradition this year. What four-year-old girl doesn't love hair clips, anyway?
Want to make some? Super-simple. Here we go! Six steps.
You'll need:
Butterfly appliques (I'm not going to share the pattern - it's copyrighted)
1.75" hair clips--one for each butterfly -- the straight ones are best
Ribbon to cover the hair clips; I used gross grain.
Hot glue and your trusty glue gun
Step 1: Pinch a clip open, and, starting on the inside, lay down a nice line of glue all the way to the end of the clip. Take your ribbon and with right side up, insert in the clip and press firmly.
Step 2: Now with the clip closed, lay down another strip of glue on the outside of the clip. Fold the ribbon over and press firmly to stick it down.
Step 3: Flip the clip over so the top of the other side is showing. Apply another strip of glue, fold the ribbon around the end of the clip and press firmly to he clip all the way to the end.
Step 4: Pinch the clip open and add one more strip of glue to the inside of the clip. Fold the ribbon over and stick down by pressing firmly.
There. You now have a ribbon-covered clip.
Step 5: On the top of the clip, you'll put down one last line of glue. Take your butterfly applique and press down firmly so that it's secured.
Let it cool and it's ready to wear!
I made one or two for each favor bag.
These little applique hair clips are a great way to use up left-over yarn. You could make these clips with any kind of applique type item: fabric flowers, animal appliques, ribbon, etc.
I hope you enjoyed learning how to make a ribbon-covered hair clip with a butterfly applique! Check out Everlaughter for some more really cool applique patterns.And if you make some cool clips, link me up in the comments! I would love to see!
I came across a crochet butterfly pattern a few months ago called from Everlaughter by Patricia Eggen. She mostly does appliques, but also has a few other patterns for sale. The butterflies really caught by eye, so I saved the pattern because I knew I would find a way to use it.
And so I did.
We're having Katie's and Ivy's birthday party this Saturday, and since I made ribbon rainbows last year for the Rainbow Party, I thought I would continue the tradition this year. What four-year-old girl doesn't love hair clips, anyway?
Want to make some? Super-simple. Here we go! Six steps.
You'll need:
Butterfly appliques (I'm not going to share the pattern - it's copyrighted)
1.75" hair clips--one for each butterfly -- the straight ones are best
Ribbon to cover the hair clips; I used gross grain.
Hot glue and your trusty glue gun
Step 1: Pinch a clip open, and, starting on the inside, lay down a nice line of glue all the way to the end of the clip. Take your ribbon and with right side up, insert in the clip and press firmly.
Step 2: Now with the clip closed, lay down another strip of glue on the outside of the clip. Fold the ribbon over and press firmly to stick it down.
Step 3: Flip the clip over so the top of the other side is showing. Apply another strip of glue, fold the ribbon around the end of the clip and press firmly to he clip all the way to the end.
Step 4: Pinch the clip open and add one more strip of glue to the inside of the clip. Fold the ribbon over and stick down by pressing firmly.
There. You now have a ribbon-covered clip.
Step 5: On the top of the clip, you'll put down one last line of glue. Take your butterfly applique and press down firmly so that it's secured.
Let it cool and it's ready to wear!
I made one or two for each favor bag.
These little applique hair clips are a great way to use up left-over yarn. You could make these clips with any kind of applique type item: fabric flowers, animal appliques, ribbon, etc.
I hope you enjoyed learning how to make a ribbon-covered hair clip with a butterfly applique! Check out Everlaughter for some more really cool applique patterns.And if you make some cool clips, link me up in the comments! I would love to see!
October 16, 2013
Wednesday's Child - My Brother's Keeper
When I was a young girl, I used to think about what I wanted
to do when I grew up. At first I wanted to be a teacher, and then as a child of
the 1960s watching television, I discovered something called the Peace Corps. I didn’t know it at the time, but it was an ambitious new social program started by the Kennedy administration. I wanted to go places, see things and help
people in far away lands who could not help themselves without me to teach
them. I knew right away joining that
organization was exactly what I wanted to do.
I excitedly ran to my mother and told her I
wanted to join the Peace Corps! She
smiled and told me no. The reality was
I, a child, was too young. I had to be
grown and go to college before they would accept me. I was disappointed, but not for long. The ’60s moved right along into the 1970s
and I moved too, forgetting all about my aspirations to join the Peace Corps.
It wasn’t until in the 1980s when I was grown, married, and
already had three children that I realized I would liked to have been a
missionary. But, missionaries went over
seas, didn’t they? I couldn’t leave my
family to help other families in need.
The reality was I had too many responsibilities; my children needed me
more than the rest of the world did, so I put the thoughts of being a
missionary out of my mind and went on with my life.
By the 1990s my family was just about grown and I started
searching my soul again. Missionary work
seemed to be out of the question so I looked in another direction. By the turn of the 21st century
things seemed to be changing. Hurricanes happened on the east coast and forest
fires burned in the west. Natural disasters were happening all over the United States. I always wanted to go to those places and
volunteer any services I could, but my life in the midwest kept me tied here. I worked in mental health services and with
juvenile placement; my children graduated high schools and colleges.
I knew I was never
going to exotic lands, not as a missionary; not even for a vacation. I watched as friends and relatives went to
all the faraway places I had always dreamed of while making do with the postcards and pictures they sent. I also
knew I would never be a missionary in the traditional sense because my calling
is to teach and work with those around me.
The people I have worked with, been friends with and those I have
counseled or in some way touched my life have made all of the difference. I don’t know if I would have been truly rewarded
had things been different. It doesn’t
really matter. I just continue to do as
I am called upon.
And now, one of those ways I can help is with
the World Wide Web, and to ask you to click on the link and take a look. A designer
of crochet patterns is donating all the proceeds from her very popular
lovey blankie to help out a family in need. Please read their story and allow
your heart to speak to you.
Labels:
crochet,
giving,
wednesday's child,
wendy
September 25, 2013
August 31, 2013
Looking Slightly Ahead
There’s been a lot of sewing and crocheting going on lately in this neck of the woods. A few orders from the Etsy store the last two weeks has been keeping me busy and I’ve been working with Wendy in preparation for a craft fair in September. We’ve been crocheting up a storm to create samples and salable hats for people to buy and order. We’re going to focus on children’s fall and winter hats, but will also showcase some of the other work we’ve done, just in case we can drum up some interest in that realm, too. I’m looking forward to revealing more details of when/where the fair will be and what we’ll be selling in the coming weeks.
Labels:
craft fair,
crafts,
crochet,
fancy bird designs
July 24, 2013
Wednesday's Child - A Fair Experience
Last week sometime, Bev called me up and wanted to know if I had anything to enter in the Jasper County Fair. I hadn’t really thought about it. After all, I entered something about 20 years ago, hadn’t I? Wasn’t that one time enough? Apparently it wasn’t enough for Bev. When I told her I didn’t have anything good enough to show, she wheedled me with flattery saying how good I am at crochet and how I should be teaching a crochet class, and couldn’t I just look around for something to enter?
Didn’t she understand, only an ARTIST is worthy enough to
show their work? I’m not an artist, I just crochet. Most of what I crochet is
someone else’s design or someone else’s pattern. Someone else fretted, counting
every stitch she made. Someone else toiled over every pattern note she penned. Only
an artist sweats the small stuff, deserving to show their work and win the
glory. What Bev probably does not realize is I tend to give everything away. There
isn’t anything I have made lying around. But, she did apparently know my
weakness! All someone has to do is tell me they like what I made, and it’s
theirs instantly! Money is no object!! Flattery is the only payment I need to
part with an item, no matter its cost to me. I decided then I would scrounge
around for something to show at the county fair!
On Friday, Bev came to pick me up for the fair. I dashed out
the door with my purse, bottle of water, and a white plastic grocery bag. Inside
the grocery bag were two baby hats I managed to find tucked away and an almost finished
work in progress (WIP). I was just sewing on the finishing touch of my WIP when
Bev parked her car outside the fairground gate. She grabbed her plastic bag of
items, and I had so little, I carried mine in one hand.
Upon signing in, we were directed to textile ARTS, our
designated area. I proudly laid out my two baby hats and my now finished object
(FO). I looked around to the closest tables to me. I was secretly pleased to
see there weren’t many entries to compete against. I was mildly disappointed
when I found out differently. Saturday is when most entries were expected. It
was then I watched Bev, who, like a magician pulling rabbits from a hat,
extracted her work from her plastic bag. Did I say work? No, it was ART. My
eyes widened with surprise as she laid out an exquisite hand spun, hand woven
mat. The mat was followed by a beautiful crocheted wool hat, and right behind
them, a pair of tiny, meticulously hand knit mittens fit for a royal child. At
that moment I knew Bev had a much better chance than anyone of us for winning a
ribbon. No one else entered anything which could compete with her entries.
Following a weekend of curiosity, I convinced my husband to
take me back to the county fair on Monday afternoon. We entered the fairgrounds
and headed straight back to the open class building. The air was charged with
the smell of barbeque and smoke, the sounds of different farm animals calling
from their stalls, and laughing children running to and fro. Inside the
building there were organized games for children and youth while their parents
looked on. My husband and I circled around to the textiles area and searched
the display for my items. Then I saw it. There is was…my pink panther inspired
iPad cover sporting a blue ribbon! I found my baby hats and they were showing
off red ribbons. Bev’s lovely items also garnered her ribbons as well.
While neither one of us had won the purple division ribbons
which would have entitled us to go to the state fair, we both came away with
first and second prize ribbons. I’m glad Bev talked me into entering the county
fair this year. I could have lost the blue ribbon I wanted; I would have been
ok with that. Most importantly, when I left the fair grounds that Friday
evening, I left with a good friend and I found my humility patiently waiting
for me outside the gate. In the end, it was I, who had won the real prize.
Labels:
county fair,
crochet,
hats,
pink panther
July 17, 2013
Wednesday's Child - More About Yarn
After talking with my friend Bev on Friday, I realized she
still needed answers. We made arrangements for me to drive over to her house so
I could help her as best I know how. I packed lots of yarn into my great big pink
craft organizer on wheels, stuffed a garbage bag full of yarn, jumped into the
car and away I went. I parked my car and Bev met me at the door, as if she had
been watching for me. Although not actually wringing her hands in despair, she
appeared to be slightly anxious. After sitting on the couch with her I found
out why. Bev is fairly new to crochet and was confused and had a lot of
questions. Here are some of them.
| The label on any skein of yarn gives a lot of information on how to use it, including washing instructions, the best hook used with it, and the yarn size or weight. |
Question 1: Which yarn is best to use?
My answer is this: Use
what you like and are comfortable with. Experiment with different yarns to see
how it looks or feels. Different textures of yarn make things interesting. The
yarns that can be bought from the craft stores and from places like Wal-Mart
tend to be standardized. Red Heart and other large yarn makers use standards
for color rather than different dye lots. You can be assured of getting the
same color and quality every time. The yarns you purchase from the local yarn
shop are different. A lot of their yarns are hand dyed and/or imported and are not
typically labeled, so enough yarn with the same dye lot needs to be bought in order to
finish a project.
![]() |
| A US Standards Chart |
Question 2: What do mean when you talk about the “number” of
the yarn?
The label which holds the yarn also gives a lot of information. When
you look at the label, you will find a number on it of 1- 6. The number on the
label tells you what size, or thickness, the yarn is. Knowing the weight of
the yarn helps to determine the outcome of the work. For instance, if you want
to crochet a pair of wool socks, the number one wool yarn would probably work
best. It is commonly called fingering yarn, is a superfine yarn, and best used
for socks and baby items, or things that need to be lightweight and
comfortable. The larger the number, the heavier the yarn.
![]() |
| Here you can see different types of yarns and their thicknesses. |
![]() |
| These are both #5 yarns, but you can see that there's a difference in the thickness due to what they're made from. |
Use the hook that best
works with your yarn. The hook size determines the outcome of your work. A
larger hook makes it bigger and a smaller hook makes it smaller. The European
standard is different from the US
standard. US hooks used to go by letter only, but now include the millimeters (mm), too. Some
older hooks, like Grandmom’s, didn’t even have a letter or number. When the
pattern calls for a gauge, the hook you use could make the difference in
whether a garment fits or not.
![]() |
| Using a gauge to measure a crochet hook. (Hint: This gauge can also be used to measure knitting needles.) |
Question 4: How do I use a measuring gauge? A lot of times,
the pattern will call for a 4”x4” test square. This is an important step when
size matters, such as an article of clothing. The measuring gauge helps to
determine how many stitches per inch is needed, and you can use a larger or
smaller hook as needed to accomplish the specified stitch per inch. The
measuring gauge can also be used to size crochet hooks and knitting needles. The
gauge has measured holes to pass a hook or needle of the same size through. The
holes are labeled by letters and millimeters (mm). This could be useful when you are using
European pattern standards and your grandmom's hand-me-down hook.
| Using the gauge to measure a 4"x4" swatch. |
We sat on her couch with a nice beginner’s pattern and bags
of yarn to choose from. The pattern called for an N size hook and a bulky #6 yarn. The garbage bag contained everything from crochet
thread (which is a #0 by the way) to the chunkier, bulkier #6 yarns. She was
able to see differences in the different wool yarns (3-4), finer baby yarns
(#1-3), the heavier chenille yarns (#5-6) and everything in between. The pink
rolling organizer held every hook I’ve ever owned from numbered steel hooks to
large lettered aluminum hooks, all the way to a couple of plastic P and Q sized
hooks.
| The label for a #6 yarn. |
We measured crochet hooks and knitting needles using the
gauge. We studied and compared all the yarns and chose which color to use and
then gauged her stitches. We laughed, took pictures and had fun. Our afternoon
was filled with crochet and friendship.
Before I took my leave, I imparted one last tip to her: Whenever you’re in a yarn or craft store and you’re not sure what you need, it doesn’t cost anything to ask questions and most clerks are happy to help.
Subscribe to:
Posts (Atom)