Analytics

Blog Template

Pinterest

August 11, 2014

My Sticker Fun - Sticker Charts

My three chitlins (4, 3, and 18 mo.) can be a pain in the rear when it comes to bedtime. The mere mention of the word turns turns the older kids from tired, relaxed, calm sweeties into hell-raising, loud, obnoxious little demons. I like to call this state of being before bed and after dinner “the crazies.” Unfortunately, the crazies seem to be a last-ditch effort to cause as much trouble as humanly possible.

When each was little, we established a bedtime routine that consists of dinner, quiet playtime (while the parents clean), pajamas, books, potty, bed, kisses/hugs/song, eyes closed. Books and websites said promised it would help bedtime go smoothly. Either they all lied, or I’m just mostly a horrible parent who can’t control her children (my ego says the former). After bedtime is complete, there are the attempts at staying up, including “I have to go to the bathroom,” “I need a drink,” “I want to sit next to daddy quietly on the couch,” and my favorite, “I can’t sleep,”  which usually happen in rapid succession.

All I ever want at 7:30 or 8 pm is to have some quiet and watch a show or two (on crazy weekend nights, we try to get a whole movie in) with my husband before we go to bed. One night, in a moment of my-kids-HAVE-to-go-to-bed-or-my-head-will explode, I decided to give the ol’ sticker chart a shot.

I made up a Super Sleeper Sticker Chart for each with a favorite character, and told them when they got seven stickers (one for each night they didn’t get up), they would get a treat of their choice. We made Saturday our treat day, they chose ice cream for their goal, and we were gonna blow the sticker chart theory out of the water!

It worked from day 1! Of course, our three-year-old has given us a few rough nights, but the threat of not getting a sticker (or worse, losing one!) turns it around pretty quickly. It’s amazing what the promise of a Saturday ice cream treat will invoke from preschoolers.

I’ll be darned if they haven’t earned an ice cream treat for five or six weeks now. Sometimes they forget about the sticker chart and a few days go by before they remember their stickers, but we always get ice cream if we’ve had a good week.

Want to try one of our Super Sleeper Sticker Charts? Click on the pics below to get one and please keep in mind that I am NOT a highly experienced graphic artist. I know about enough to get by, so no complaining about the quality of the charts. I do what I can, and the kids won’t care. :) 

Barring any snags, I'll be making more and adding them as I can. If you have a request, leave a comment and I will see what I can do!

Happy Kat Sticker Chart


Queen Elsa 1 Sticker Chart


Queen Elsa 2 Sticker Chart


Sofia Super Sleeper Sticker Chart


https://drive.google.com/file/d/0Bxj3rMjmW1sMTXpLcDE5T1N1MXM/edit?usp=sharing


 Winter Snowman Potty Chart


July 1, 2014

My Middle Name is Adventure, Part 2

Well, I gave it a shot. I made the chili-cornbread pizza.


And it was a complete…


I can’t even describe to you how delicious it was. The cornbread was sweet, moist, and evenly baked and the chili was hearty and flavorful. Probably not the healthiest the most delicious way to eat chili. Want the recipes? I don’t blame you.


First let me explain how I made it.

CORNBREAD:

While doing research on the all-knowing Interwebz, I found a few other people who have tried making a cornbread-chili pizza. One recipe that intrigued me was a cornbread dough (rather than a batter) with the chili baked on top, just like you would with pizza toppings. While that person’s CC Pizza looked good, I knew I wouldn’t be happy with a cornbread crust that was too dense. So I turned to mom’s Southern cornbread recipe:

  • 1 1/4 C flour
  • 3/4 C corn meal
  • 2 tsp baking powder
  • 1/2 C sugar
  • 3/4 tsp salt
  • 1 1/4 milk
  • 1/4 C shortening
  • 1 egg

Preheat the oven to 400. Mix the dry ingredients together. Cut in the shortening evenly so the dry mixture is evenly crumbly. Add the egg and milk. Mix, making sure that the egg is totally mixed in. To make the cornbread crust, spray a deep, 12” cast-iron frying pan with cooking spray and pour about *half* the batter in.

With the extra batter, you can make little cornbread muffins or something. If you're daring enough, you can cut the ingredients in half to make just the right amount. But I promise, if you make the whole amount, you won't have any left over.

CHILI:

While the cornbread is cooking, make your (thick) chili (or, if you like, make your chili beforehand). For my chili, I typically use the following:

  • 1 lb ground beef
  • 1 T oil
  • 1 onion, chopped
  • garlic to taste (I used organic pre-diced garlic)
  • 3 or 4 cans of beans
  • leftover corn, if I have some
  • 32 oz. jar picante sauce (I like using the medium or hot, but kids seem to prefer the mild) If you want a chunkier "base," use chunky salsa
  • cumin to taste
  • chili powder to taste (usually about 3-5 T)
  • 1/2 C beer or white wine, optional (really brings out the tomato flavor, but you have to simmer for a little while)


In a pot, heat oil and brown the onions and garlic. Add the ground beef. I usually cook mine down until there's no liquid left so I don't have to drain it. Add the picante sauce. Add the beans and any other extras you like (corn, etc.). Add spices and alcohol (optional) and let simmer until cornbread is finished.

THE PIZZA:

Let the cornbread cool for a short period of time and then use a knife to cut it like a pizza. Spoon/pour some chili over your cornbread crust, sprinkle with cheese and stick back in the over for a few more minutes to melt the cheese (or, if you lack the virtue of patience like I do, just sprinkle on some cheese and call it good).

Pull it out, and get your pizza server out.

Serve yourself up some freakin' delicious chili-cornbread pizza!


June 6, 2014

Adventure Is My Middle Name

Okay folks. It’s been a while but I wanted to share with you a culinary idea my brother dreamed up.


He called me on the phone yesterday in a flurry of excitement and told me he had this great idea for a pizza, but not just any pizza. No. This pizza would be an entirely different animal; no run-of-the-mill toppings like pepperoni, sausage, or even pizza sauce. This pizza would be savory and comforting. This pizza would be a—wait for it—cornbread chili pizza.


“A cornbread chili pizza?” I asked, making sure I heard him right.


“Yeah,” he said. “You know: corn bread for the crust and chili for the toppings. And cheese on top.”


I mulled it over for a few minutes and decided it could work. The cornbread would have to be thin enough to eat, but dense enough to hold the chili and stay rigid so you could eat it. The top crust would have to be “sealed” enough to prevent too much chili juice from soaking in and causing it to fall apart. The chili would have to be relatively thick, too.


So, this Saturday, June 7, I’m going to give it a try. I’ll use my mom’s uber-delicious Southern corn bread recipe and my own chili recipe (which just so happens to be quite thick).

Be sure to come back for the recipes used, photos, and a recap of the experiment on Sunday, June 8.

February 1, 2014

Free Pattern - Boucle Headband and Cowl Set


To get myself through the last few months of winter (so sad!), I felt like I needed something new and pretty. My scarf, even though I really love it, can be burdensome because of the length. About a year ago, I bought some yarn I just loved from which to make a slouch hat. Unfortunately, the pattern I was using didn't make a whole lot of sense and I never got it done. I was in headband making mode, so I thought I would whip this little set up.

Enjoy!


Boucle Headband and Cowl Set (adult size)


Materials:
Lion Brand Silky Twist in Linen (2 5oz. balls)
Size N crochet hook
Yarn Needle
Large Buttons (optional)

Stiches:
ch = chain
dc = double crochet
dc2tog = double crochet two together


Headband:

Ch7
Row1: In second ch from hook, dc in each ch across. Ch 3. Turn. (5)
R2: Dc in first two stitches, 2dc in third stitch, dc in last two stitches. Ch 3. Turn. (6)
R3: Dc in each stitch across. (6)
R4: Dc in first three stitches, 2dc in fourth stitch, dc in last two stitches. Ch 3. Turn. (7)
R5: Repeat R3 (7)
R6: Dc in first three stitches, 2dc in fourth stitch, dc in last three stiches. Ch 3. Turn. (8)
R7: Repeat R3 (8)
R8: Dc in first three stitches, 2dc in fourth stitch, dc in last four stiches. Ch 3. Turn. (9)
R9: Repeat R3 (9)
R10: Dc in first four stitches, 2dc in fifth, dc in last four stiches. Ch 3. Turn. (10)
R11: Repeat R3 (10)
R12: Dc in first four stitches, dc2tog, dc in last four stiches. Ch 3. Turn. (9)
R13: Repeat R3 (9)
R14: Dc in first three stitches, dc2tog, dc in last four stitches. Ch 3. Turn. (8)
R15: Repeat R3 (8)
R16: Dc in first three stitches, dc2tog, dc in last three stitches. Ch 3. Turn. (7)
R17: Repeat R3 (7)
R18: Dc in first two stitches, dc2tog, dc in last three stitches. Ch 3. Turn. (6)
R17: Repeat R3 (6)
R16: Dc in first two stitches, dc2tog, dc in last two stitches. Ch 3. Turn. (5)
R17: Dc in each stitch across. (5) Do not fasten off. First, test the headband around your head to make sure it would fit. If you need to add more length, repeat row 3 until long enough.

Once headband is long enough, fasten off, leaving a long thread for sewing.
To sew the ends together, use a mattress stitch. (It can be tough with this yarn, but if you do your best, it should be fine). Weave in ends.

Alternatively, you can fasten off and weave in as usual and then add a large button to one end. To fasten just slip the opposite end over the button.


Cowl:

Ch22
Row 1: Dc in second chain from hook and each chain across. Ch 3. Turn. (20)
R2-36. Dc in each st across. Ch 3. Turn. (20)
R37: Dc in each st across. (20) Do no fasten off. Test the cowl around your neck to make sure it drapes down as far from or as close to your neck as you would like it. If you need to add more length, repeat row 2 until it's until long enough.

Once the cowl is the size you want, fasten off, leaving a long thread for sewing.
Sew the ends together using a mattress stitch. Weave in ends.

Alternatively, you can fasten off and weave in as usual after the last row and then add two or three large buttons to one end of the cowl. To fasten just slip the opposite end over the buttons.

Show me yours!

Questions, comments, or see a mistake? Leave a comment for me.


January 18, 2014

Warm Rainbows

About a year ago, my mom made my eldest child Katie a sweet hat and hand warmer set from the prettiest Bernat Pipsqueak yarn. I couldn't believe how incredibly soft and warm it was and loved it so much that I decided we should share it with the world.

You can now get the pattern for this cozy set in our Etsy shop!

Happy mid-winter warm up!


January 8, 2014

Wednesday's Child: Something Old, Something New

You know the old saying about everything that goes out of style always comes back? Out of style for decades, it appears they are now in style again. I’m talking about beautiful beaded doilies which are used as jar covers and as accents on glassware. For some reason I am so inspired by them! Some time ago I stumbled onto a picture of a crochet cake cover and fell immediately in love. I searched the internet for the cake cover pattern and always it would take me back to the same site; http://heirloomtreasuresfiberarts.com/heirloom-heritage-techniques. While I enjoyed the site, I never found a pattern for this beautiful cake cover.


In my quest to find the ever-elusive crochet cake cover I ferreted out some beaded jar patterns. The really neat thing about the beaded jar covers is they are not only pretty; they can be practical as well. Imagine a dainty little jeweled doily covering your pitcher of iced sweet tea, keeping it bug-free while you sit on the front porch with friends. If you don’t crochet, I found this idea from http://www.pompomemporium.com/content/how-upcycle-a-cotton-doily:

In charity shops you can often see a pile of doilies languishing unappreciated in with the linens, it's a shame as obviously a lot of time and effort went into hand-crocheting these cotton doilies. Pondering their plight I had the idea of up-cycleing them into jug/bowl covers, to keep flies off food and drink in summer. All you do to give them a new lease of life is attach, by sewing, glass beads* around the edge.
*Glass ones have more weight than plastic ones.
I found the Bourbon Rose Jug/Bowl Cover here: http://megan.cc/BowlCover/


This is a free pattern for you to download and she not only gives you the pattern, she also has a section which tells you how to do the blocking. It would not be hard to make a fashion statement on your table with these. Beaded covers make the ordinary appear extraordinary!

This vintage pattern below is free from: http://www.knitting-and.com/crochet/jugcover.htm It’s originally from the 1940’s. It is so cute with a little crochet cup and saucer on top and would make a charming display in a kitchen.


But why stop at jug and jar covers? Can’t you just see little crochet beaded snowflakes sparkling from a Christmas tree branch, hanging from a nylon thread in a window, or even from a ceiling, as the beads catch the light? How cool would that be?! Or what about making coasters for parties? How about beaded “skirts” for wine glasses. Throw one over your pie dish or bowl of potato salad! They would make nice gifts too. For those who can’t or don’t want to crochet, what could be easier than to buy one from an internet store such as Etsy or E-bay?

There are even books available with a number of different patterns.


It’s time to re-enjoy old fashioned ideas and traditional crochet by making something updated and fun! If you have some ideas or some cool pictures of how to use beaded doilies, don’t hesitate in letting me know. Who knows, maybe I’ll do a post on it!

January 2, 2014

Making Ribbon-Covered Butterfly Hair Clips

I haven't been around here for a while, so I thought I would give you something nice. A ribbon-covered butterfly hair clip in six steps.

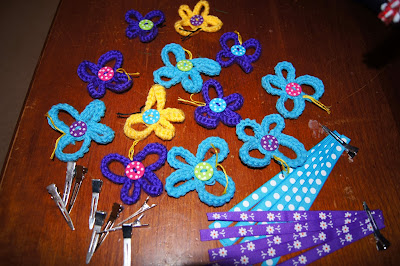
I came across a crochet butterfly pattern a few months ago called from Everlaughter by Patricia Eggen. She mostly does appliques, but also has a few other patterns for sale. The butterflies really caught by eye, so I saved the pattern because I knew I would find a way to use it.

And so I did.

We're having Katie's and Ivy's birthday party this Saturday, and since I made ribbon rainbows last year for the Rainbow Party, I thought I would continue the tradition this year. What four-year-old girl doesn't love hair clips, anyway?

Want to make some? Super-simple. Here we go! Six steps.

You'll need:
Butterfly appliques (I'm not going to share the pattern - it's copyrighted)
1.75" hair clips--one for each butterfly -- the straight ones are best
Ribbon to cover the hair clips; I used gross grain.
Hot glue and your trusty glue gun

 
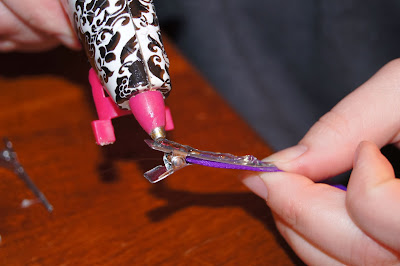
Step 1: Pinch a clip open, and, starting on the inside, lay down a nice line of glue all the way to the end of the clip. Take your ribbon and with right side up, insert in the clip and press firmly.


Step 2: Now with the clip closed, lay down another strip of glue on the outside of the clip. Fold the ribbon over and press firmly to stick it down.


Step 3: Flip the clip over so the top of the other side is showing. Apply another strip of glue, fold the ribbon around the end of the clip and press firmly to he clip all the way to the end.


Step 4: Pinch the clip open and add one more strip of glue to the inside of the clip. Fold the ribbon over and stick down by pressing firmly.


There. You now have a ribbon-covered clip.


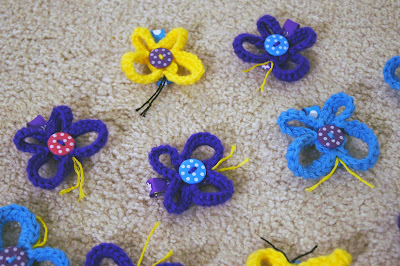
Step 5: On the top of the clip, you'll put down one last line of glue. Take your butterfly applique and press down firmly so that it's secured.


 Let it cool and it's ready to wear!


I made one or two for each favor bag.


These little applique hair clips are a great way to use up left-over yarn. You could make these clips with any kind of applique type item: fabric flowers, animal appliques, ribbon, etc.

I hope you enjoyed learning how to make a ribbon-covered hair clip with a butterfly applique! Check out Everlaughter for some more really cool applique patterns.And if you make some cool clips, link me up in the comments! I would love to see!


Related Posts Plugin for WordPress, Blogger...